Difference between revisions of "Test Integration"
(→Notes) |
(→Uploading and Viewing Results in Test Space) |
||
| Line 46: | Line 46: | ||
<source lang="bash"> | <source lang="bash"> | ||
| − | stride --database=<path>/stride.sidb --device=<device_address> -u --testspace= | + | stride --database=<path>/stride.sidb --device=<device_address> -u --testspace=<user>:<pwd>@<mycompany>.stridetestspace.com --project="Stride Deployment" --space=TestIntro --run="*" |
</source> | </source> | ||
Revision as of 14:48, 20 February 2013
In this article, we discuss adding tests to your target build and running these tests.
The starting point of this article assumes that you have completed the steps described in the article Build Integration.
Contents
Adding the TestIntro Tests to the Target Build
Here we will add the TestIntro sample tests to the target build.[1] We will use the same technique used earlier in the Build Integration to incorporate these tests.
The SCL pragmas that declare the TestIntro test units are in the file s2_testintro_test.h, so this file needs to be supplied as input to the STRIDE build tools. If you are using the Makefile technique described in Build Integration, you simply need to add [path]Samples/TestIntro/s2_testintro_test.h to the SCL_SRCS_H variable so that it will be picked up as input to s2scompile.
In addition, you need to include the TestIntro source files in the target compile/link.
Once the build is complete, download the binary to the target in preparation of running the tests.
Running the TestIntro Tests
To execute the TestIntro tests, use a Windows or Linux host computer that has connectivity with the target system via your configured STRIDE transport (TCP/IP or serial). Additionally, make the generated STRIDE database (.sidb) visible to the host computer via a shared filesystem or a file copy to the host system.
If not already present, install the appropriate desktop Framework package on the host computer.
To run the tests, ensure that your target system is running, then enter the following in a host console:
stride --database=<path>/stride.sidb --device=<device_address> --run="*"
The text below should be output to your host console as the test progresses.
Loading database...
Connecting to device...
Executing test units...
  s2_testintro_cclass
    > 1 passed, 1 failed, 0 in progress, 0 not in use.
  s2_testintro_flist
    > 2 passed, 1 failed, 0 in progress, 0 not in use.
  s2_testintro_testdoubles
    > 3 passed, 0 failed, 0 in progress, 0 not in use.
  s2_testintro_testpoints
    > 3 passed, 0 failed, 0 in progress, 0 not in use.
  ---------------------------------------------------------------------
  Summary: 9 passed, 2 failed, 0 in progress, 0 not in use.

Disconnecting from device...
Saving result file...
Uploading and Viewing Results in Test Space
Optionally, if you have Internet connectivity and access to your company's Test Space[2] you could run again the TestIntro tests and upload the results by executing:
stride --database=<path>/stride.sidb --device=<device_address> -u --testspace=<user>:<pwd>@<mycompany>.stridetestspace.com --project="Stride Deployment" --space=TestIntro --run="*"
Open your web browser, login to your company's test space site if needed and navigate to the All Projects page.
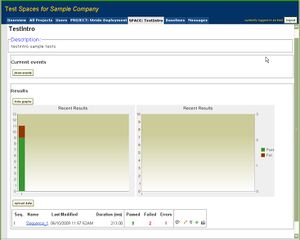
You should now see the TestIntro test space listed under the Stride Deployment project, and see that TestIntro's Result Set Count is now 1.
Click on the TestIntro link to be presented with the TestIntro space page. At the bottom of the page you will see a table displaying the uploaded result sets for this test space. Click on the Sequence_1 link to show detailed results for this test run.
Notes
- ↑ The TestIntro sample is distributed in the Samples package.
- ↑ You need to have an account with access to a dedicated "Stride Deployment" project and "TestIntro" space created by your Test Space administrator
